Sharing a part of my presentation during the Experts Live Asia Pacific 2019 held in Kuala Lumpur, Malaysia.
What is Windows Autopilot
Windows Autopilot is a collection of technologies used to set up and pre-configure new devices, getting them ready for productive use.
Aside
from that Windows Autopilot can be used to reset, repurpose and recover
devices.
This solution enables an IT department to achieve device deployment with little
infrastructure to manage, with a process that’s easy and simple.
In addition, Windows Autopilot is designed to simplify all parts of the lifecycle of Windows devices, for both IT and end users, from initial deployment through the eventual end of life.
Leveraging on the cloud-based services, it can reduce the overall costs for deploying, managing, and retiring devices by reducing the amount of time spent and infrastructure to maintain, while ensuring the ease of use for all types of end users.
Why Windows Autopilot?
Out of the box and ready to go
When a user unboxes his/her new Windows device and turn it on Windows Autopilot configures it from the cloud— with a few simple clicks, the device becomes business-ready.
Self-service provisioning
Windows Autopilot makes it easy for end users to set up new devices, without any IT involvement.
Provisioning minus the hassle
It delivers a better user experience with personalization and fewer steps to set it up.
Keep track of the whole process
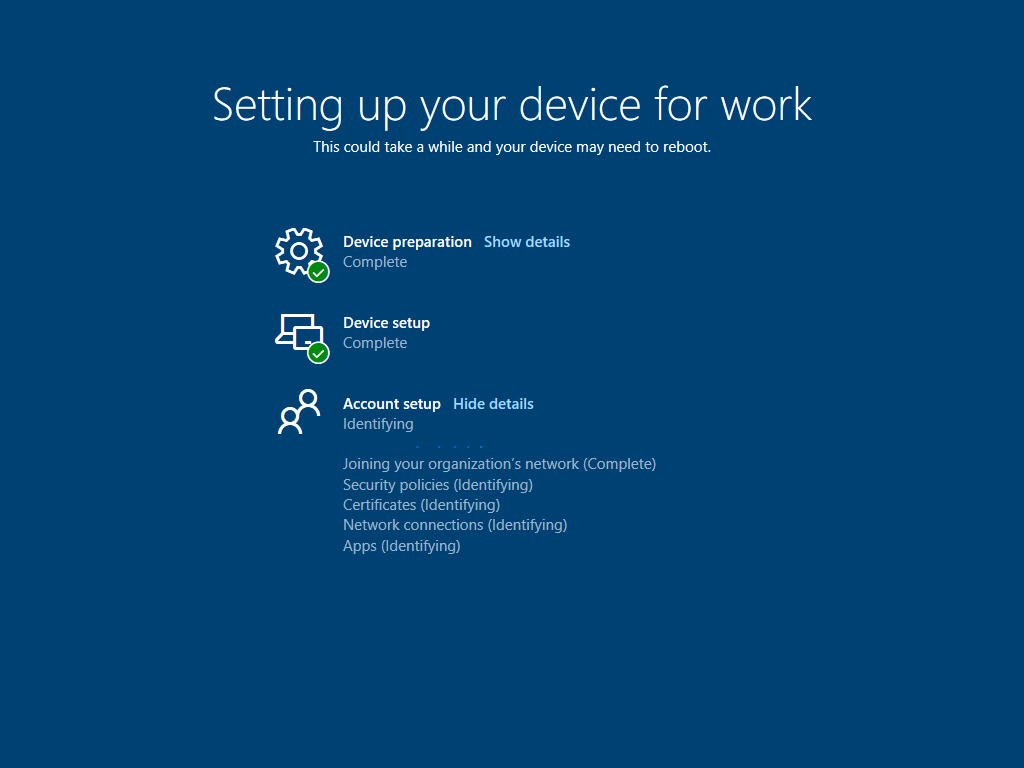
With Windows Autopilot, users can see how configuration is progressing with Enrollment status page which ensures that devices are fully configured, compliant and secure before users can access the computer.
Move to the cloud at your own pace
The only time you move to the cloud is when Windows Autopilot join devices to Azure Active Directory and enrols them in Intune (mobile device management.)
Windows Autopilot Reset
IT admins can now execute a Windows Autopilot Reset remotely via Microsoft Intune or locally to easily prepare devices for re-use by removing all applications, settings and files.
The only time you move to the cloud is when Windows Autopilot join devices to Azure Active Directory and enrolls them in Intune (mobile device management.)
Traditional Windows deployment
Traditionally, it has been a practice where IT pros spend a lot of time building and customizing images that will later be deployed to devices via Task Sequences. Either with your MDT/SCCM.

Points to consider to move away from the traditional deployment are:
- Custom imaging time consuming / costly
- Driver management
- Maintenance of application (frequent updates > package > upload to SCCM > distribute > deploy
- And we’re just redoing the image deployment on a new machine that has Windows already installed in it.
Modern Windows deployment
Windows Autopilot introduces a new approach, it leverages the OEM-optimized version of Windows 10 that is preinstalled on the device, saving organizations the effort of having to maintain custom images as well as drivers for every model of device being used. Instead of re-imaging the device, that existing Windows 10 installation can be transformed into a “business-ready” state, applying settings and policies, installing apps, and even changing the edition of Windows 10 being used.

From your end-user’s perspective, it only takes a few simple operations to make their device ready to use.
From your IT department’s perspective, the only interaction required from the end user is to connect to a network and to verify their credentials. Everything past that is automated.
Key Benefits
The main benefit of Windows Autopilot is that the devices is already in a “business-ready” state.
Business ready means that is all line of business application is on the machines, all your security policies are on that machine and its now ready for productive use
While Retirement / Refurbish process of a device is seamless.
- No more maintenance of images and drivers
- No need for IT to touch the devices
- Simple process for users and IT
- Integration in the device supply chain
- Reset device back to a business ready state
How Autopilot works
- Device Registration – register new devices to the Autopilot deployment service, claiming ownership for your organization
- Profile creation & assignment – customize the user set up experience and configuration by creating a deployment profile that you can assign to your organization’s devices.
- Ship the device to user – when your user receives the device from the hardware vendor, the moment they turn it on and go online, Windows Autopilot delivers all the apps and settings that has been configured for them.
Administering Windows Autopilot
There are a number for portals available to administer Windows Autopilot to register devices and to create and assignment of profiles. Intune is recommend!
- Partner Center
- Microsoft Intune
- Microsoft Store for Business
- Microsoft 365 Business & Office 365 Admin
Windows Autopilot Requirements
There are several requirements must be met before using Windows Autopilot. These include purchasing specific licenses, network and managing configuration settings.

Windows Autopilot uses functionality available in Windows 10 operating system, the Azure Active Directory for Identity Management Service and Microsoft Intune for mobile device management (or you can use other mobile device management solution that you prefer)
Windows 10 Requirements
- Windows 10 1703 (semi-annual channel) or higher is required.
- Windows 10 editions:
- Windows 10 Pro
- Windows 10 Pro Education
- Windows 10 Pro for Workstations
- Windows 10 Enterprise
- Windows 10 Education
- Windows 10 Enterprise 2019 LTSC
Licensing requirements
- Microsoft 365 Business
- Microsoft 365 Enterprise E3 or E5
- Microsoft 365 F1
- Microsoft 365 Academic A1, A3, or A5
- Enterprise Mobility + Security E3 or E5
- Intune for Education
- Azure Active Directory Premium P1 or P2 and Microsoft Intune (or other MDM)
Network requirements
As Windows Autopilot deployment service is a cloud-based, the basic network requirement is you need to have an internet access,
DNS name resolution and access on firewall ports, 80 for http, port 443 for https and port 123 for UDP and NTP.
- Internet access
- DNS name resolution for internet DNS names
- Allow access to all hosts via port 80 (HTTP), 443 (HTTPS), and 123 (UDP/NTP)
And also depending on your network topology you may also need to configure the following additional requirements.
Proxy server settings, firewall access to the Windows Autopilot service, bandwidth configurations etc.
Configuration requirements
Before you can use Windows Autopilot you must perform the following tasks in Azure AD. You need to configure Azure AD automatic enrollment, this allows devices to be automatically enrolled into an MDM service, and configure Azure AD custom branding. This is required to display an organization’s specific log-on page during the Autopilot device deployment phase.
- Configure Azure Active Directory automatic enrollment.
- Configure Azure Active Directory custom branding.
- Subscription Activation
- Device Registration
- Profile Configuration
DEMO: Automatic Enrollment and Company Branding for Windows Autopilot
I’ve signed into my Microsoft 365 Enterprise subscription as a tenant admin.
On the Microsoft 365 admin center, on the left-hand side, I’ll click show all, scroll down for the admin centers and select Azure Active Directory. Azure AD portal appears.
On the left-hand side I’ll click Azure Active Directory. Under manage I’ll scroll down and I’ll select Mobility. And then select Microsoft Intune.
On the Configure page under MDM user scope I’ll select all and copy and paste it under Mobile Application Management (MAM) user scope to replicate the terms of use URL from MDM to MAM and then click save.
The settings were updated and I can close this blade.
The I’ll go to Company Branding and then click configure. As you can see I already upload my company branding and logo.
We can see that the default branding is now in place.
This is the imagery that my users will see when they first boot their PC.
Back to the Microsoft 365 admin center, I’ll scroll down. Select all admin centers and then select Intune. This will launch the Microsoft 365 Device Management page.
I’ll select Device Enrollment and then Windows Enrollment on the left-hand side.
Here we can see under general, Automatic Enrollment. And we can see on the configure page that MDM and MAM user scope has been configured. Once you’ve completed the initial setup tasks you’re ready to use Windows Autopilot.
Windows Autopilot Deployment

The Windows Autopilot deployment process is very straight forward, it has three main steps, the first one is were there devices are purchased from a vendor (OEM, Resellers or partners).
Second, administration this is were the device settings are pre-configured. And the last one is when an end user receives their new device which they need to connect to the Internet with their credentials will be later on verified, and the device will then be automatically provisioned and be ready to used.
Device registration

- Get the CSV for Import in Intune
- Add devices – You can add Windows Autopilot devices by importing a CSV file with their information
- Create an Autopilot device group – Where Membership type, choose either Assigned or Dynamic Device.
- Create an Autopilot deployment profile
- Assign an Autopilot deployment profile to a device group
Acquiring Harware Device ID
Before a device can be registered in Windows Autopilot we need to acquire its Device Hardware ID
There are number of ways to discover the ID of a device:
- From Vendor, your vendor can supply a list of device hardware IDs for the newly purchased devices. It will be sent to you as a CSV formatted file.
- From ConfigMgr (CB 1802 or later)
- From PowerShell Script (Manually)
The second way is to find the device hardware ID yourself. By either, using systems center configuration manager, current branch version 1802 or later which can auto-collect device hardware IDs, or by collecting the hardware IDs from your devices using PowerShell script to output the details into a CSV file.
Adding devices to Windows Autopilot https://docs.microsoft.com/en-us/windows/deployment/windows-autopilot/add-devices
PowerShell script https://www.powershellgallery.com/packages/Get-WindowsAutoPilotInfo
Demo: How to manually acquire a Hardware ID with PowerShell
To get a hardware device ID from a Windows 10 in OOBE perform the following:
- Press Shift+10
- The command prompt will appear, type PowerShell
- Create a directory, md C:\HWID
- Type, Set-Location C:\HWID
- Type Set-ExecutionPolicy Unrestricted
- Type Install-Script -Name Get-WindowsAutoPilotInfo
- PATH Environment Variable Change: Y
- NuGet provider is required to continue: Y
- Untrusted repository: A
- Type Get-WindowsAutoPilotInfo.ps1 -output <filename.csv>
- Copy out the csv file from C:\HWID

The CSV file will have 3 columns:
- Column A: Device Serial Number
- Column B: Windows Product ID
- Column C: Hardware Hash
These device hardware IDs are the identifier for the devices, a hardware ID is a string of letters and numbers, which can be used to uniquely identify each individual device.
Registering new devices
Before deploying a device using Windows Autopilot, the device must be registered with the Windows Autopilot deployment service. Ideally, this would be performed by the OEM, reseller, or distributors from which the devices were purchased:
- They will add new devices to Azure tenant at time of shipment
- Will associate devices to customer’s purchase order for easy device grouping
- Tag devices with a customer specified label
If you are using Microsoft Partner, they’ll be able to perform the task for you. They’ll upload the CSV file on your behalf using the partner center. It’s also possible for your vendor to pre-register the device hardware IDs for you. And then send you a confirmation when this has been done. Once the CSV file has been uploaded, the devices will be registered as belonging to your organization.
This can also be done by the organization by collecting the hardware ID and uploading it manually.
Registering existing devices
If have exist devices that and want them to register in to autopilot, the easy way to do that is to create a profile set Convert all targeted devices to Autopilot to Yes.

The all non-Autopilot devices in assigned groups will register next time Autopilot deployment service syncs.
What this means is for those existing devices, the next time you reset/re-purpose the device it will go thought the Windows Autopilot experience.
Create an Autopilot device group
To create an Autopilot device group:
- In Intune, choose Groups > New group.
- In the Group blade:
- For Group type, choose Security.Type a Group name and Group description.For Membership type, choose either Assigned or Dynamic Device.
- The click on Create.
Intune will automatically assign the profile to all members of the assigned group
Note: Windows Autopilot device group is an Azure AD group where an Autopilot profile is assigned
Create an Autopilot deployment profile
Autopilot deployment profiles are used to configure the Autopilot devices.

Deployment mode
- User-driven mode
- The process is designed to be simple so that anyone can complete it, enabling devices by simply unboxing the device
- There are 2 options available for user-driven deployment
- Azure Active Directory join – When devices do not need to be joined to an on-premise Active Directory domain.
- Hybrid Azure Active Directory join – When devices that must be joined to both Azure Active Directory and your on-premise Active Directory domain.
- Self-deployment mode
- Windows Autopilot self-deploying mode enables a device to be deployed with little to no user interaction.
- Self-deploying mode is designed to deploy Windows 10 as a kiosk, digital signage device, or a shared device.
- Device with TPM 2.0 is required – Because self-deploying mode uses a device’s TPM 2.0 hardware to authenticate the device into an organization’s Azure AD tenant, devices without TPM 2.0 cannot be used with this mode.
Create an Autopilot deployment profile
Autopilot deployment profiles are used to configure the Autopilot devices.
Out-of-box experience (OOBE)
- Privacy Settings
- Hide change account options
- User account type
- Apply device name template

Assigning Autopilot profile
After creating autopilot profile the next step is to take that profile and assign it to your devices the easiest way is to create a dynamic group in AAD.

Assign a user to a specific Autopilot device
You can assign a user to a specific Autopilot device. This assignment pre-fills a user from Azure Active Directory in the company-branded sign-in page during Windows setup. It also lets you set a custom greeting name.

In the OOBE Autopilot knows that the device belongs to the user and would just ask for the password to continue.

Demo: Device Registration, Autopilot Device group, Deployment Profile and group assignment
The video below will show the steps on how to perform device registration, autopilot device group creation, autopilot deployment profile creation and group assignment.
User Experience
When the device is received the end user will unpack their device and power it on for the first time. The user will then complete the out of box experience or OOBE, this involves the user selecting the region, choosing their keyboard layout, and selecting if they wish to add a second keyboard to be used with the device.
Reference links
- https://www.microsoft.com/en-us/windowsforbusiness/windows-autopilot
- https://docs.microsoft.com/en-us/intune/enrollment-autopilot
- https://docs.microsoft.com/en-us/windows/deployment/windows-autopilot/windows-autopilot-scenarios
- https://www.youtube.com/watch?v=1–pBivksl8
- https://docs.microsoft.com/en-us/windows/deployment/windows-autopilot/existing-devices
- https://blogs.technet.microsoft.com/mniehaus/2018/10/25/speeding-up-windows-autopilot-for-existing-devices/
- https://docs.microsoft.com/en-us/intune/windows-autopilot-hybrid

Leave a Reply