This post will show the step-by-step process on how to install System Center Configuration Manager (Current Branch) version 1902 as a Standalone Primary Server in a Windows Server 2019 lab environment from scratch and later on we will upgrade it to SCCM Current Branch version 1906.
I have broken down this post in a series of steps:
- Step 1. Primary Site Server Installation Prerequisites
- Virtual Environment
- Installation Media
- AD Accounts
- Server Configuration
- Create System Management Container and Delegate of Permission
- Extend Active Directory Schema for SCCM 1902
- Configure Windows Firewall
- Step 2. Install Web Server (IIS) Role and other Features
- Step 3. Installing and Configuring SQL Server 2017
- SQL Server 2017 Installation
- MS SQL Server Management Studio Installation
- Configure SQL Server Memory Allocation
- Step 4. Windows ADK Installation
- Installing Windows ADK for Windows 10
- Installing Windows PE add-on
- Step 5. Install Windows Server Update Services
- Step 6. Configuration Manager 1902 Installation
- Step 7. Configuration Manager 1906 Upgrade Installation
- Step 8. Optional: MDT 8456 Installation and ConfigMgr Integration
Step 1. Primary Site Server Installation Prerequisites
Virtual Environment
For the virtual environment I usually use Hyper-V in Windows 10/Windows Server 2016/2019 or VMWare Workstation.

- A host computer with enough disk space (1TB to 2TB SSD recommended) and RAM (32GB or higher)
- Virtual Machines:
- DC01 = Domain Controller (I have a server core setup)
- C:\ | Windows | 80 GB
- 2GB RAM
- CM01 = Primary Site Server (Domain joined)
- Recommend Partition setup:
- C:\ | Windows | 100 GB
- D:\ | SCCM / SQL /Logs | 200 GB
- 16 GB RAM or higher is recommended (70% to be allocated for the database)
- Recommend Partition setup:
- DC01 = Domain Controller (I have a server core setup)
Installation Media
What you need:
- Windows Server 2019
- SCCM 1902
- SQL Server 2017
- MS SQL Management Studio
- Windows ADK 1903 and Windows PE add-on
Download the iso files from your Visual Studio Subscription or Microsoft Evaluation Center
AD Accounts
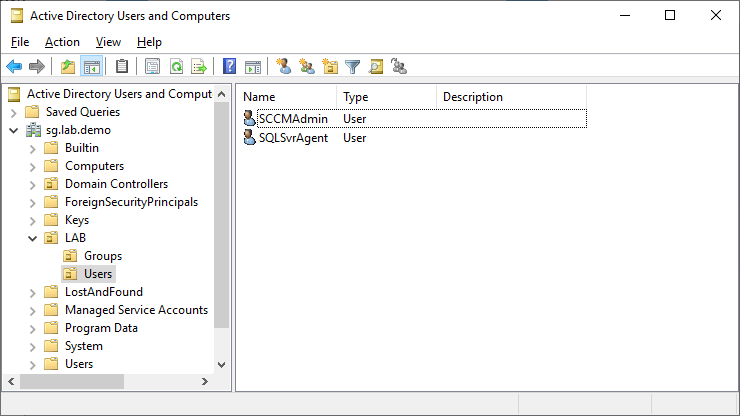
For this installation I have created accounts
- SCCMAdmin – account to be used for administering ConfigMgr
- SQLSvrAgent – account to be used as the SQL Server Account
You can go ahead and create the rest of the required SCCM Accounts
- SCCM Network Access Account
- SCCM Client Push Install Account
- SCCM Domain Join Account (for OSD)
- SCCM Admins Group
- SCCM SQL Reporting Account (If you’re uninstalling Reporting Services)
Server Configuration
Add LAB\SCCMAdmin and LAB\CM01 to the local Administrators group for CM01.

Create System Management Container and Delegate of Permission
Open ADSI Edit to create the System Management container

In the left pane, browse the Default naming context > expand DC and look for CN=System > make a right-click > in the context menu select New > Object…

In the Create Object window, scroll and select container and click Next.

In the Value: type System Management (it’s important to take note of the spelling, capitalization and the space between the two words).

click Finish to close the window.
Launch Active Directory Users and Computers and on the View tab, click on Advance Features

Browse for System > System Management > Right-click and select Delegate Control.

In the Delegation of Control Wizard click Next.

Add the Primary Site Server, CM01 once the server is added, click Next.
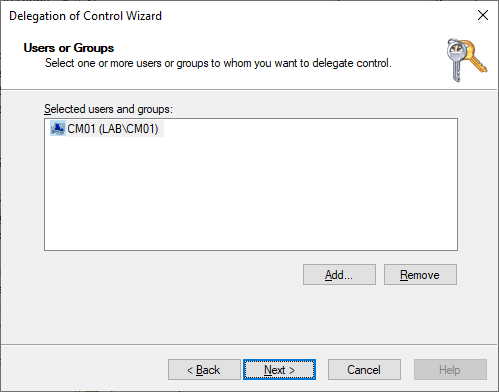
In the Task to Delegate, select Create a custom task to delegate click Next.

In the Active Directory Object Type select This folder, existing objects in this folders, and creation of new objects in this folder and click Next.

Tick on the 3 permissions General, Property-specific and Creation/deletion of specific child objects. Under Permissions tick on Full Control and click Next.

Click Finish to close the wizard.

Back in the System Management Properties, confirm that the Primary Site Server has Full Control Permission.

Note: As my Domain Controller was installed as a Server Core, I installed the Remote Server Administrator Tool (RSAT) for ADDS in the Primary Site Server to have access to the Active Directory Services Interface (ADSI Edit) tooland Active Directory Users and Computers.
Extend Active Directory Schema for SCCM 1902
In the Primary Site Server, mount the installation file of System Center Configuration Manager 1902 and browse to its directory <Drive>:\SMSSETUP\BIN\X64\ you’ll find the extadsch.exe file.

You can either double click on it or run it from your command prompt

When you run the Extadsh.exe its actually running ConfirMgr_ad_schema.ldf, this LDF file contains the instructions for what needs to be changed in Active Directory to support the schema extensions.
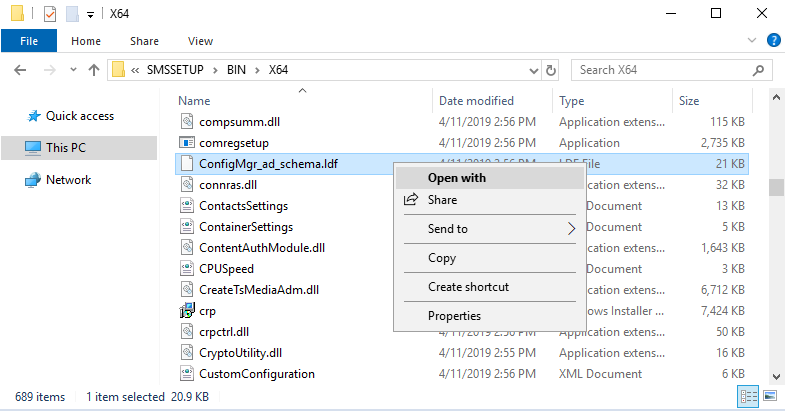
You can examine its content by opening ConfirMgr_ad_schema.ldf in Notepad.

If you’re curious go and browse through the SMS Schema Attributes. This will give you better understanding on how Active Directory schema extensions work for Configuration Manager.

From the LDF file:
# ———————————————————————-
# This section adds a new attribute for SMS Capabilities information. This is a
# new attribute for SMS V4.
#
# This attribute updates the MS-SMS-Management-Point class.
# ———————————————————————-
dn: CN=mS-SMS-Capabilities,CN=Schema,CN=Configuration,DC=x ← this is the path of where the change is going to happen
changetype: add ← it’s going to add something
objectClass: top
objectClass: attributeSchema ← theres an obect class that attributes schema
cn: mS-SMS-Capabilities ←in this folder location
attributeID: 1.2.840.113556.1.6.29.2.1.14 ← here is the ID
attributeSyntax: 2.5.5.4 ←Syntax value
#schemaIDGUID:: y1C8EEwlBkWgB+T2V+XESA== ← here its showing the GUID
isSingleValued: TRUE
oMSyntax: 20
searchFlags: 0
isMemberOfPartialAttributeSet: TRUE
dn:
changetype: modify
replace: schemaupdatenow ← this portion will update the schema
schemaupdatenow: 1
For more information about Extending the Schema in Configuration Manager go to this link
In the root directory for your Primary Site Server, you’ll see a small text file ExtADSch.txt and when you open it, you’ll find the line: Successfully extended the Active Directory schema.

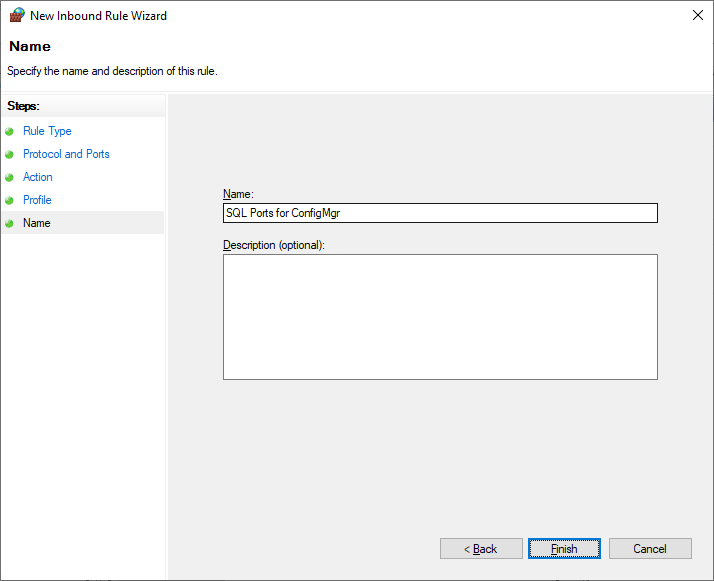
Configure Windows Firewall
To open TCP port 1433 and 4022 for SQL replication you need to launch the Windows Defender Firewall and Advance Security to do that, press Windows logo key, type wf.msc and click on it

In the Windows Defender Firewall and Advance Security right-click Inbound Rules, and then click New Rule.
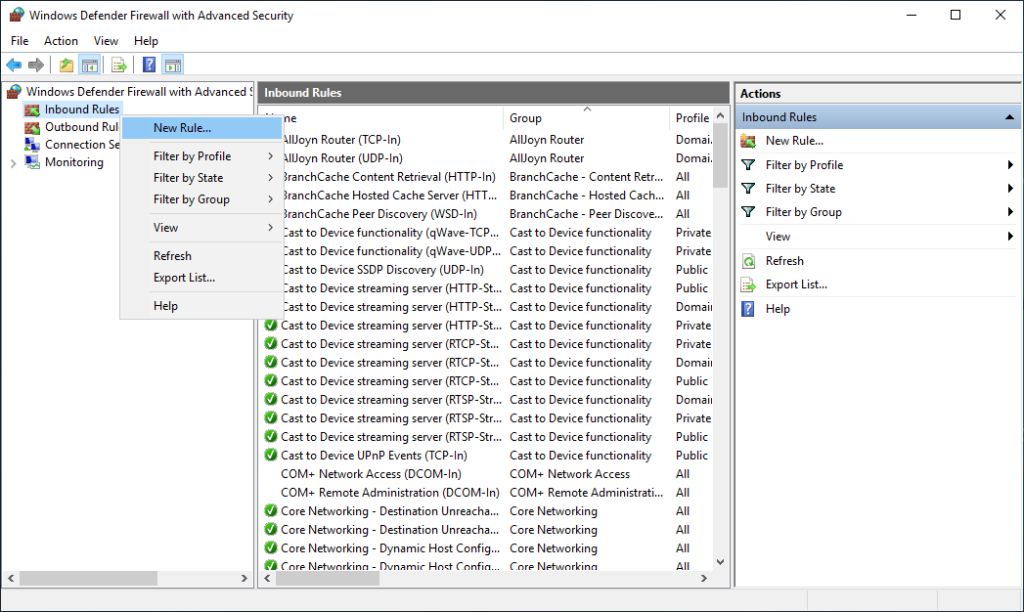
In the Rule Type dialog box, select Port and then click Next.

In the Protocol and Ports dialog box, select TCP. Select Specific local ports, and then type port numbers 1433 for SQL Server default instance and 4022 for Inter-site communications use the SQL Server Service Broker. Click Next.

In the Action dialog box, select Allow the connection, and then click Next.

In the Profile dialog box, select Domain and then click Next.

In the Name dialog box, type a profile name,like SQL ports for ConfigMgr and then click Finish.
Step 2. Install Web Server (IIS) Role and other Features
In the Primary Site Server we will need to install the follow Roles and Features from the Server Manager:
In the Server Roles, select Web Server (IIS)
When prompted to “Add features that are required for Web Server (IIS)?” click the Add Features button.and click Next.
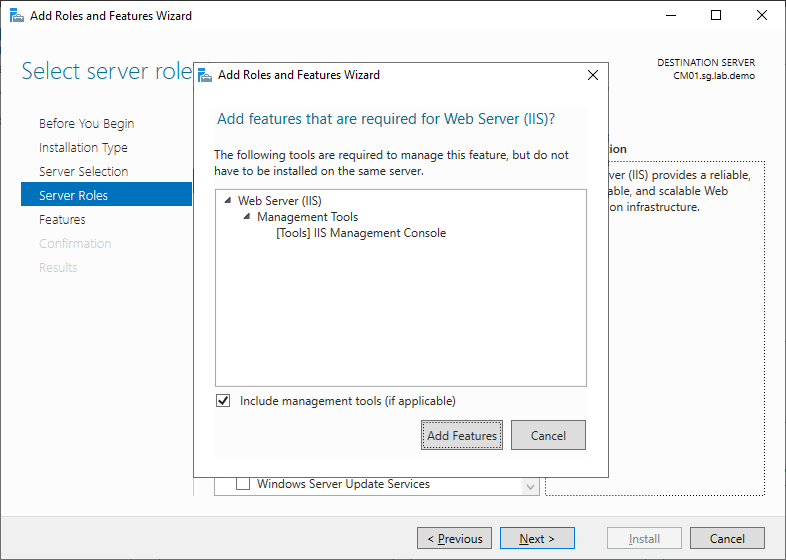
In Features, select .NET Framework 3.5 Feature and Background Intelligent Transfer Service (BITS)

Note: BITS – is the technology that allows us to throttle all the network communication that occurs between servers to client where it utilizes idle bandwidth to transfer data.

Still in the Features page, scroll down and select Remote Differential Compression (RDC) and click Next.
Note: RDC – is a client–server synchronization algorithm which BITS leans on to ensure that the files goes in the most efficient way possible.
In the Web Server Role (IIS) > Role Services select the following:
Web Server (IIS)
- Web Server
- Common HTTP Features: Default Document, Directory Browsing, HTTP Errors Static Content, HTTP Redirection
- Health and Diagnostics: HTTP logging, Logging tools, Request Monitor Tracing, Tracing
- Performance: Static Content Compression
- Security: Windows Authentication
- Application Development: .NET Extensibility 3.5, .NET Extensibility 4.7, ASP.NET 3.5, ASP.NET 4.7, ISAPI Extensions, ISAPI Filters
- Management Tools
- IIS Management Console
- IIS 6 Management Compatibility: IIS 6 Metabase Compatibility, IIS 6 WMI Compatibility
- IIS Management Scripts and Tools

In the Add Roles and Feature Wizard > Confirm installation selection page, review the Roles and Features selected:
- NET Framework 3.5 Features
- .NET Framework 4.7 Features
- Background Intelligent Transfer (BITS)
- Remote Differential Compression
- Web Server (IIS)
- Web Server
- Common HTTP Features: Default Document, Directory Browsing, HTTP Errors Static Content, HTTP Redirection
- Health and Diagnostics: HTTP logging, Logging tools, Request Monitor Tracing, Tracing
- Performance: Static Content Compression
- Security: Windows Authentication
- Application Development: .NET Extensibility 3.5, .NET Extensibility 4.7, ASP.NET 3.5, ASP.NET 4.7, ISAPI Extensions, ISAPI Filters
- Management Tools
- IIS Management Console
- IIS 6 Management Compatibility: IIS 6 Metabase Compatibility, IIS 6 WMI Compatibility
- IIS Management Scripts and Tools
- Web Server
Click the Install button to complete the installation of the Web Server Roles and Features.

Verify that the installation is successful from this point you can now click the Close button to proceed to the next step.

Step 3. Installing and Configuring SQL Server 2017
SQL Server 2017 Installation
In this section we will install and configure the Primary Site’s database server and it’s components. Go a head an mount the SQL Server 2017 installer and run the setup.exe.
In the SQL Server Installation Center > Installation, click on the New Server stand-alone installation or add features to an existing installation.

In the Product Key page, choose for the Evaluation or enter a product key then click Next to continue.

Agree to the License Terms then click Next.

In the Microsoft Update we’ll skip the check updates for now, click Next.

In the Install Rules, make sure that everything pass else rectify by clicking the Status links, as for Windows Firewall we’ll ignore the Warning as the required ports for SQL replication was previously configured. We will now and proceed to the Feature Selection page.

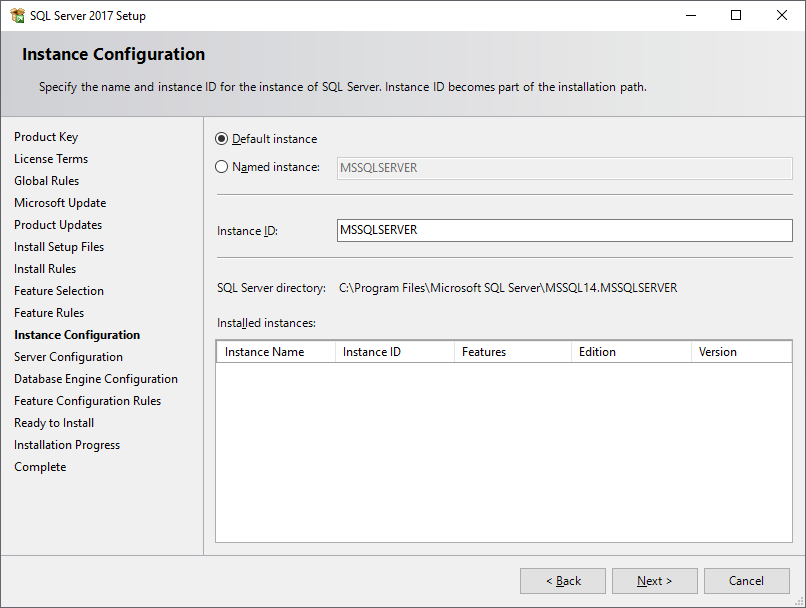
In the Feature Selection, tick the Database Engine Services then click Next.

In the Instance Configuration, leave the default instance ID, MSSQLSERVER click Next to continue.
In the Server Configuration, Service Accounts tab, make sure to configure ALL SQL services to run under a domain user account (e.g., LAB\SQLSvrAgent) instead of the local system or network services.
Note: Best practice in Production, the SQL Server Agent and SQL Server Database Engineer should each have a domain accounts. For their account’s passwords should be configured not to expire and cannot be changed (so make sure these service accounts are restricted not have an interactive logon rights as well).

…Moving on, in the same window click the Collation tab.

In the Database Engine Configuration, click Add Current User or add another user/SCCM Admin groups and click Next.

SQL Server 2017 is ready to install, click the Install button.

Note: Notice the Configure file path, you can go to the directory and explore the ConfigurationFile.ini if you’re interested to install SQL Server using the configuration file.

Confirm that SQL Server 2017 is successfully installed, click the Close button to complete the installation.

MS SQL Server Management Studio Installation
Beginning SQL Server 2016 the release of SQL Server Management Studio (SSMS) was a stand-alone install outside of the SQL Server release. That is why we need to do a separate install of the SSMS.
Download and install SSMS

After the installation is complete you are required to restart the Primary Server.

Configure SQL Server Memory Allocation
Launch the SQL Server Management Studio, Right-click on the CM01 (SQL Server) and select Properties.

In the Server memory options I have set the Minimum and Maximum memory size to 12288 if it’s not set to at least 8192 you’ll have a little warning during the installation of Config Manager. Setting the Memory b/w 2048 to 4096 will still work.
By default the Minimum server memory (in MB) is set to 0 and the Maximum server memory (in MB) is set to 2147483647.

Click OK to close the Server Properties window and complete the SQL configuration.
Step 4. Windows ADK Installation
In any Configuration Manager deployment I strongly recommend to install the lasted Windows 10 ADK in preparation for Windows 10 Operating Systems Deployment with Configuration Manager, the Windows ADK is a required external dependency.
Note: As of this blog post, the latest version of ADK is 1903.
From docs.microsoft.com: The following table lists the versions of the Windows 10 ADK that you can use with different versions of Configuration Manager.

In this section we will install Windows ADK 1903 and Windows PE add-on for ADK
Installing Windows ADK for Windows 10
Download and run the adksetup.exe

The installation is very straight forward, in the Specify Location leave the default and click Next.

In the Select the features you want to install, as for this installation we will only select the following:
- Deployment Tools
- Imaging and Configuration Designer – this can be used later on for provisioning packages.
- Configuration Designer
- User State Migration Tool
After selecting the features to to install, click Install button.

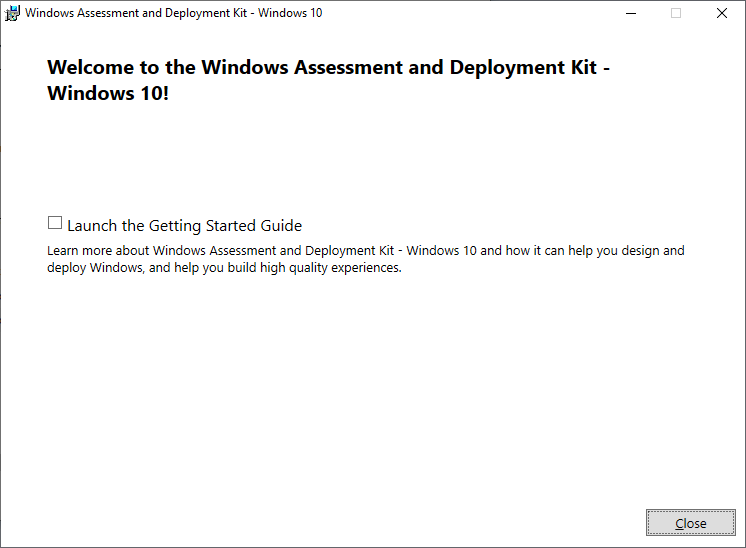
You’ll get the Welcome screen to Windows 10 ADK once the installation is completed. Click Close to finish the installation.
Installing Windows PE add-on
Starting Windows 10 1809, Windows Preinstallation Environment (PE) has been released separately from the Windows ADK.
To add Windows PE to the ADK installation, we need to download the Windows PE add-on and run the included installer after installing the ADK.
Similarly to Windows ADK the WinPE Add-on is a straight forward install. Download and run the adkwinpesetup.exe
In the Specify Location, click Next.

There’s nothing else to select in the Select the features you want to install other than Windows PE. Click the Install button to complete the installation.

Step 5. Install Windows Server Update Services
For us to deploy software updates using Configuration Manager we need to install the WSUS Server Role. WSUS will be later on be integrated with the Software Update Point (SUP) Site System Role.
In the Server Manager select Windows Server Update Services and click Next.

In the Role Services, tick WSUS Services and SQL Server Connectivity, in this example we will make use of the SQL Server database that we just installed in Step 3 instead of Windows Internal Database (WID).

In the Content location selection define a local or network share to store the updates. In this example I have pointed it to C:\WSUS.
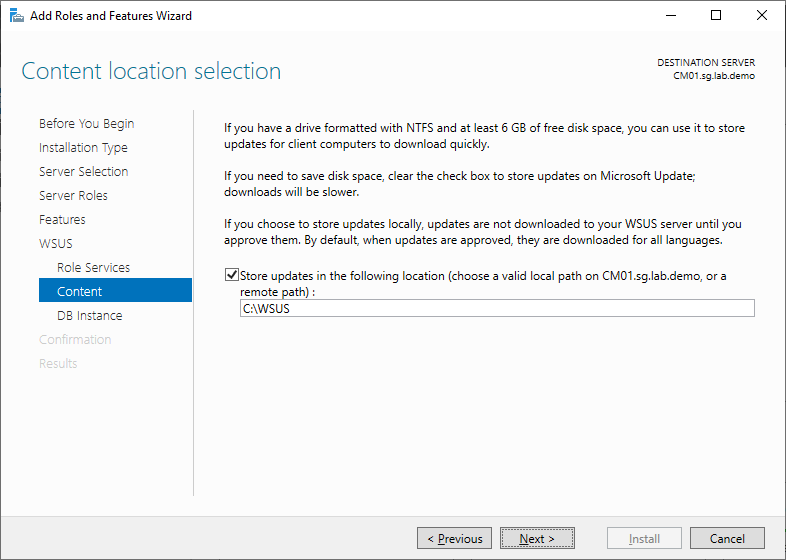
For the Database Instance Selection we’ll use the Primary Site’s database CM01.sg,lab.demo.

Click Install to proceed installing the WSUS role.

In the Installation progress once you see the installation succeeded go and click on the Launch Post-Install task then click on the Close button.

You can see the status of the Post-deployment Configuration from the Server Manager. Verify that the Configuration is completed.

We can also verify from SSMS that SUSDB has been created under the Databases.

Step 6. Configuration Manager 1902 Installation
Finally after all the preparation we are now ready to the install SCCM 1902. Go and mount the SCCM 1902 ISO and run the Setup.exe.
Download Required Prerequisite Files
Optional: We can download the required prerequisite files prior to the installation of Configuration Manager. This is usually done if your server is in an isolated network.

After click the Download required prerequisite files the Configuration Manager Setup Downloader will pop-up, select a directory where to download the file and click Download.

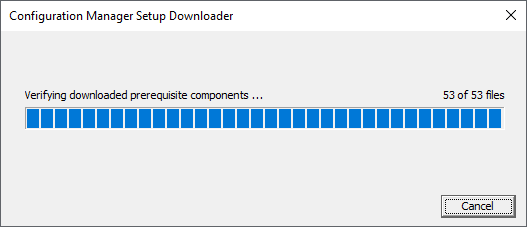
The downloader tool will close automatically after the download is complete, for this download I got 56 files in my Prereqs folder.

Install SCCM v1902
In the SCCM installation screen click Install

Click Next.

Select Install a Configuration Manager primary and tick the Use typical installation options for stand-alone primary site box.
A pop-up box will appear, read through and click on the Yes button.

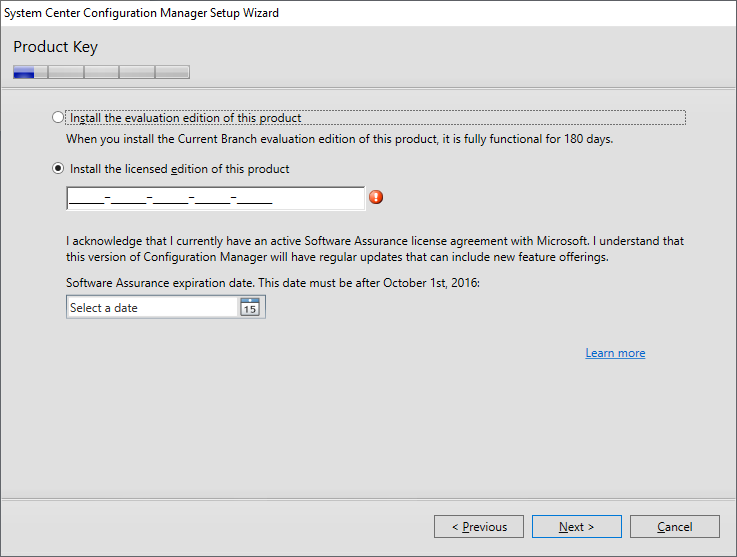
In the Product Key. select an option and click on Next.
In the Product License Terms, tick all the 3 boxes and click Next.

For the Prerequisite Downloads we’ll be using the Use previously downloaded file option and point it the folder where we downloaded the files.

Let wizard finish verifying the files

In the Site and Installation Settings , enter a 3 character site code and site name that normally pertains to the site location and click Next.

In the Diagnostic and Usage Data click Next.

In the Service Connection Point Setup in this example, we will select the Yes, let’s go connected (recommended) as my server has internet connectivity, if you’re server is in an isolated network select the Skip this for now option.

Click the Next button for the final Prerequisite Check.

In the Prerequisite Check page, make sure there’s no problem found and if there is fix it first before clicking the Begin Install button.

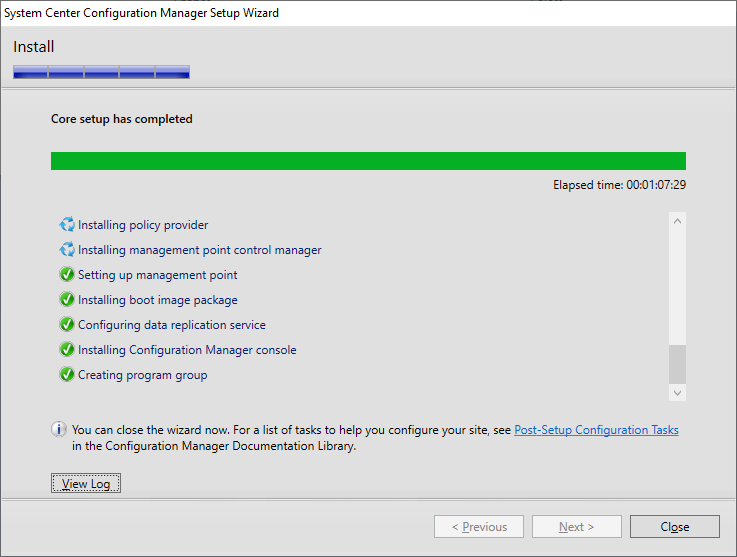
After clicking the Begin Install you’ll be brought to the Install page to see the over all progress. You may want to grab a coffee or a beer at this point (you deserve it) and come back after an hour.

To see the detailed progress you can click the View log button, make sure to set and use CM Trace.exe as the default log viewer.
Note: CMTrance can be found in the SCCM installer’s directory e.g., D:\SMSSETUP\TOOLS

After an hour later, your Configuration Manager 1902 installation core setup is completed – Congratulations!
There’s a Post-Setup-Configuration Tasks link in the wizard which will lead you this Post-update checklist link: http://go.microsoft.com/fwlink/p/?LinkId=626562 go ahead an open the link

for version 1902 here’s the post-update check list: https://docs.microsoft.com/en-us/sccm/core/servers/manage/checklist-for-installing-update-1902#post-update-checklist
Now go ahead launch the SCCM Console and open the About window

and verify that the SCCM version is on 1902.

Don’t configure the Configuration Manager server yet as we will update it first to version 1906 in the next step.
Step 7. Configuration Manager 1906 Upgrade Installation
Before we begin to upgrade our SCCM 1902 to 1906 you may want go through on the what’s new in version 1906 of SCCM Current branch https://docs.microsoft.com/en-us/sccm/core/plan-design/changes/whats-new-in-version-1906
Support for Configuration Manager current branch versions
Also its good to get to know about the Servicing Support/end of support dates for Configuration Manager versions from this link: https://docs.microsoft.com/en-ca/sccm/core/servers/manage/current-branch-versions-supported

SCCM 1906 Prerequisite Check
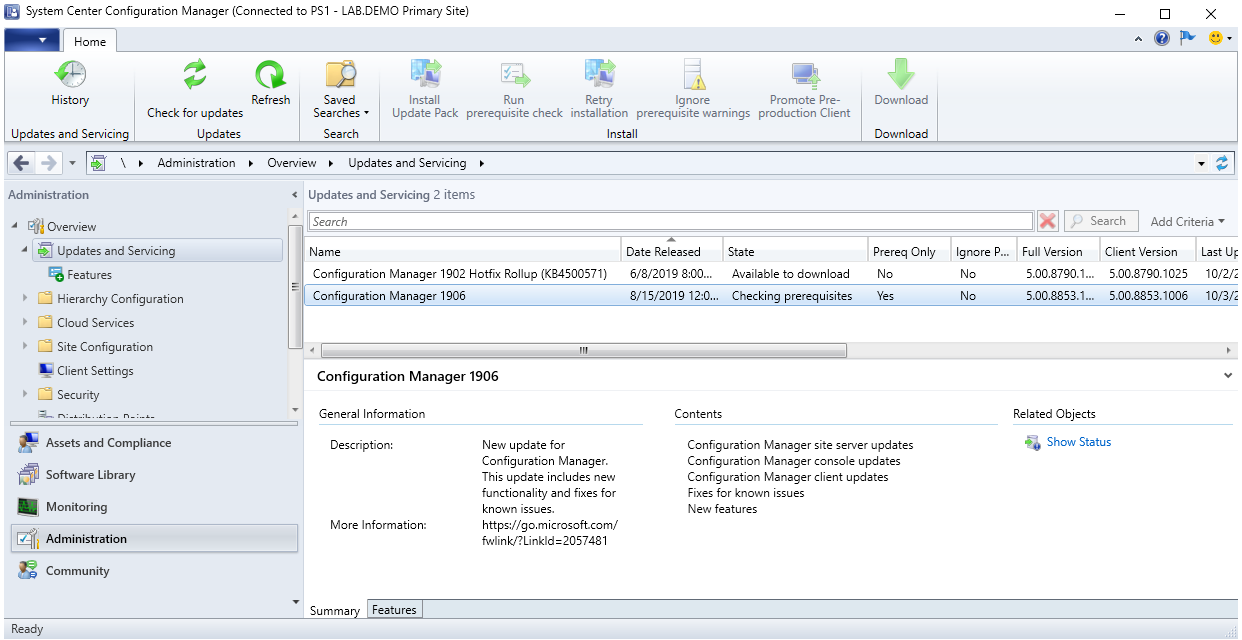
Launch the SCCM console and go to Administration > Updates and Servicing and verify that the Configuration Manager 1906 is in Ready to install State. (This will appear if your SCCM is connected to the internet for sometime)

Highlight Configuration Manager 1906 and Run prerequisite check

You will see that the Status is now Checking prerequisites.
We can see the progress by opening the C:\ConfigMgrPrereq.log with CMTrace.

Alternatively we can also view the progress from the Monitoring workspace > Updates and Servicing Status right-click on the Configuration Manager 1906 and select Show Status.

The Update Pack Installation Status window will pop-up. At anytime you can click the OK button to close the window.

Back in the SCCM Console wait until the Prerequisite check passed

Select and right-click the Configuration Manager 1906 update and select Install Update Pack

SCCM 1906 Update
The Configuration Manager Updates Wizard will launch and in the General click on Next.

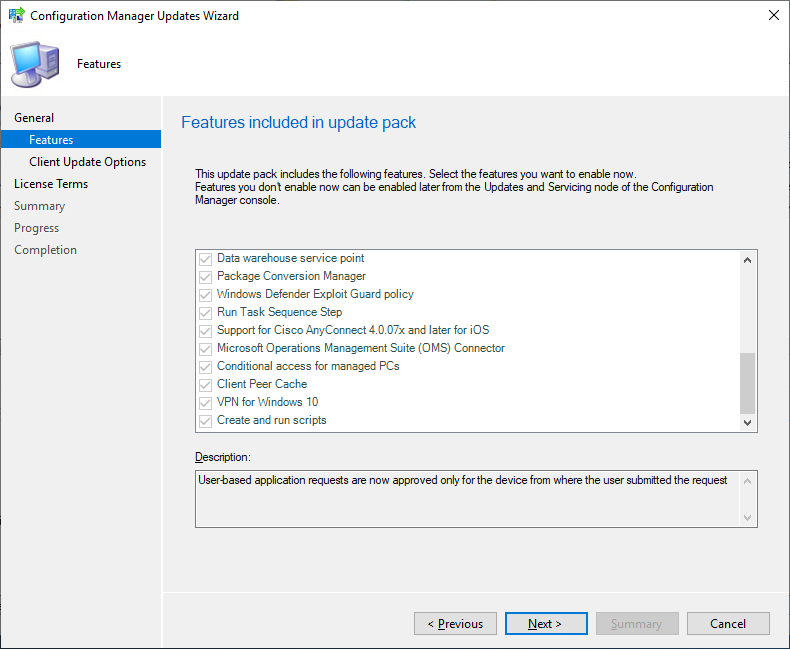
In the Features, select the feature you need to install, in my case the check boxes are pre-selected already I just needed to click Next.
Note: if you don’t want to select any of the features you can always enable it later, from the SCCM console Administration workspace > Updates and Servicing > Features.
In the Client Update Options, I will select Upgrade without validating as I don’t have any active client yet.

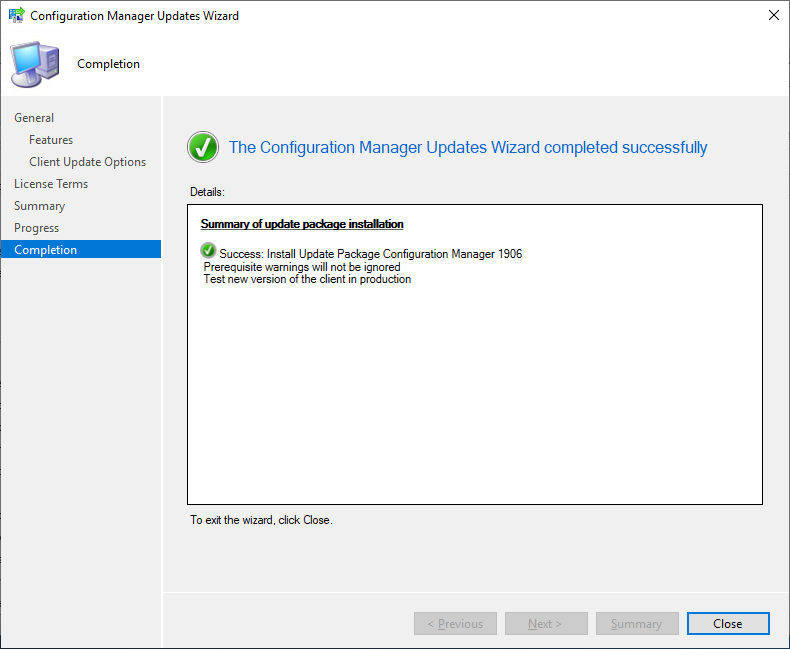
In the License Terms tick and accept the license terms box and click Next and in the Summary click on Next.

Click Close and go back to the SCCM Console to monitor the progress of the update.
In the Monitoring workspace > Updates and Servicing Status you can see that the status is Installing, go and right-click on the Configuration Manager 1906 and select Show Status to further view the detailed status.

It will take something for the installation to complete. Once completed, click the OK button to close the Status window.

In the SCCM Console, you will get a notification that “A new version of the console is available…. ” go and click on the Install the new console version link.

The SCCM console will close and go through the installation process.


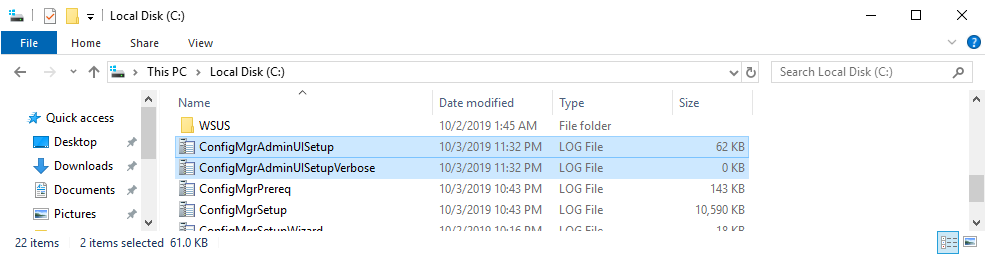
You can view the progress from the log files C:\ConfigMgrAdminUISetup.log and C:\ConfigMgrAdminUISetupVerbose.log and after the installation is completed the new SCCM Console will automatically launch.
In the console, go and verify that the SCCM version is now in 1906.

We can refer the Configuration Manager versions from this link: https://docs.microsoft.com/en-us/sccm/core/servers/manage/updates#supported-versions

We can further confirm the Primary Site version from its Properties you can see that the Version and Build number refers back from the table above.

Later on you may see a Configuration Manager 1906 Hotfix Rollup, you can go a head and install it as at this point our SCCM Lab is still empty, the procedure of install the hotfix is the same as the SCCM 1906 Update do Run prerequisite check and Install Update Pack.

That concludes our SCCM 1906 installation process. Congratulation you made it this far!
Step 8. Optional: MDT 8456 Installation and ConfigMgr Integration
This section will show how to integrate the Microsoft Deployment Toolkit with Configuration Manager 1906 and understand the benefits of integrating MDT with SCCM.
I strongly recommend that you always include MDT to your SCCM infrastructure as this will add many enhancements (280 to be exact) in the Windows Operating System Deployment with Configuration Manager. enhancements that MDT adds to Configuration Manager.
Note: as of writing the latest version used is MDT 8456
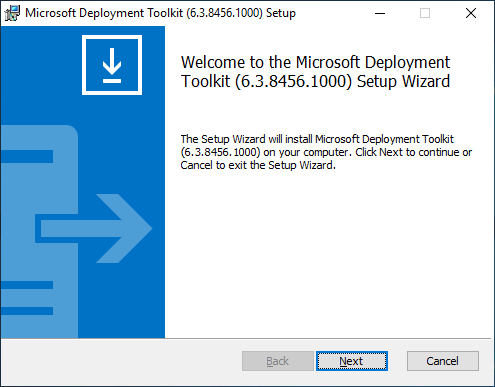
Install MDT
After you download MDT copy it over to your Primary Site Server and run the MicrosoftDeploymentToolkit_x64.msi file.
In the MDT Setup Wizard click Next
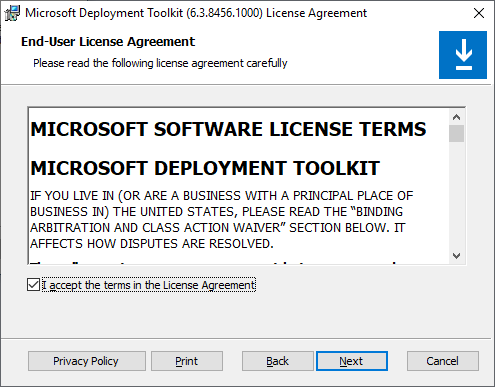
Accept the License Agreement and click on Next
In the Custom Setup leave the defaults (as we will not be using MDT as the deployment tool) and click Next.

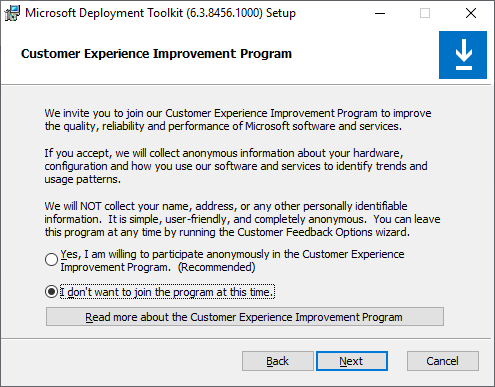
In the CEIP click Next
In the next page, click Install.

Once the MDT setup is complete click the Finish button to close the window.

Integrate MDT 8456 with SCCM 1906
To integrate MDT with SCCM we need to run the Configure ConfigMgr Integration as administrator from the Start Menu > Microsoft Deployment Toolkit

In the Options, the Install the MDT extensions for Configuration Manager is selected by default. The check boxes have been ticked, the Site server name and Site code boxes have been automatically populated with the SCCM server details. Click Next to proceed.

Verify that the integration is successful. Click Finish to close the window.

In the SCCM 1906 Console, go to the Software Library workplace > Overview > Operating Systems > Task Sequences
You will that there will a Create MDT Task Sequence available in ribbon.

Summary
In this post we have completed the following
- Build a SCCM 1902 lab environment
- Upgrade SCCM 1902 to 1906
- Integrate MDT with SCCM
Now you are ready to perform Software Deployment Services and Operating System Deployment with the lab that we’ve built. Thanks for taking time to read this post.


Happen to know if the current branch is compatible with sql 2019? Installing a new site and wanted to use the latest sql
Posted by Craig Bonvechio | February 4, 2020, 10:05 pmBased from the documentation SQL 2019 is not listed yet.
https://docs.microsoft.com/en-us/configmgr/core/plan-design/configs/support-for-sql-server-versions
Posted by jay | February 4, 2020, 11:28 pmThanks for the article! Followed it as is except I installed SQL on a separate server. Question – I’m trying to install the role Application Catalog web service point and it isn’t listed as an available role. From some research I see that CAS servers can’t install those roles. Did I inadvertently install a CAS? I thought the install was for a stand alone primary site which would include all the roles.
Posted by Jeremy | March 28, 2020, 3:01 amwhat is the access for the domain accounts?
SCCM Network Access Account
SCCM Client Push Install Account
SCCM Domain Join Account (for OSD)
SCCM Admins Group
SCCM SQL Reporting Account (If you’re uninstalling Reporting Services)
Thank you.
Posted by MICHAEL Farber | April 17, 2020, 4:54 amWhat is the access for the domain accounts:
SCCM Network Access Account
SCCM Client Push Install Account
SCCM Domain Join Account (for OSD)
SCCM Admins Group
SCCM SQL Reporting Account
Thank you.
Posted by Mike Farber | April 17, 2020, 4:55 amSCCM Network Access Account: domain user
SCCM Client Push Install Account: domain user of course& local admin in the target machines
SCCM Domain Join Account: delegated to join a PC to the domain
SCCM Admins Group: you can add this group in sccm admin role so the members can manage the sccm
SCCM SQL Reporting Account: unfortunately I’m not using I, but there is a group ion SQL server for reporting as I know.
Posted by Mohammed Zyarah | May 15, 2020, 6:46 amHi Jayrbarrios,
After the installed, I can’t Configuration Manager console cannot connect to the Configuration Manager site database.
It is show the following log, Pls help me.
[1, PID:7656][07/01/2021 11:20:45] :Microsoft.ConfigurationManagement.ManagementProvider.SmsConnectionException\r\nThe SMS Provider reported an error.\r\n at Microsoft.ConfigurationManagement.AdminConsole.SmsSiteConnectionNode.GetConnectionManagerInstance(String connectionManagerInstance)
at Microsoft.ConfigurationManagement.AdminConsole.SmsSiteConnectionNode.CreateConnectionManagerInstance(String connectionManagerInstance, IConsoleConfig settings)\r\nThe SMS Provider reported an error.
\r\nMicrosoft.ConfigurationManagement.ManagementProvider.WqlQueryEngine.WqlQueryException\r\nThe SMS Provider reported an error.\r\n at Microsoft.ConfigurationManagement.ManagementProvider.WqlQueryEngine.WqlConnectionManager.Connect(String configMgrServerPath)
at Microsoft.ConfigurationManagement.AdminConsole.SmsSiteConnectionNode.GetConnectionManagerInstance(String connectionManagerInstance)\r\nInvalid namespace
\r\nSystem.Management.ManagementException\r\nInvalid namespace \r\n at System.Management.ThreadDispatch.Start()
at System.Management.ManagementScope.Initialize()
at System.Management.ManagementObjectSearcher.Initialize()
at System.Management.ManagementObjectSearcher.Get()
at Microsoft.ConfigurationManagement.ManagementProvider.WqlQueryEngine.WqlConnectionManager.Connect(String configMgrServerPath)\r\nManagementException details:
________________________________________________________________________________________________
The Configuration Manager console cannot connect to the Configuration Manager site database. Verify the following:
• This computer has network connectivity to the SMS Provider computer.
• Your user account has Remote Activation permission on the Configuration Manager site server and the SMS Provider computer.
• The Configuration Manager console version is supported by the site server.
• You are assigned to at least one role-based administration security role.
• You have the following WMI permissions to the Root\SMS and Root\SMS\site_ namespaces: Execute Methods, Provider Write, Enable Account, and Remote Enable.
Posted by Kyaw | July 1, 2021, 1:49 pmIs the Site Database hosted in a different server? if yes, check firewall ports and Antivirus white list. Also have you verify everything in your list??
Posted by Jay-R Barrios | July 4, 2021, 3:07 pmawesome blog easy to setup MECM
Posted by Anonymous | May 5, 2023, 3:25 am