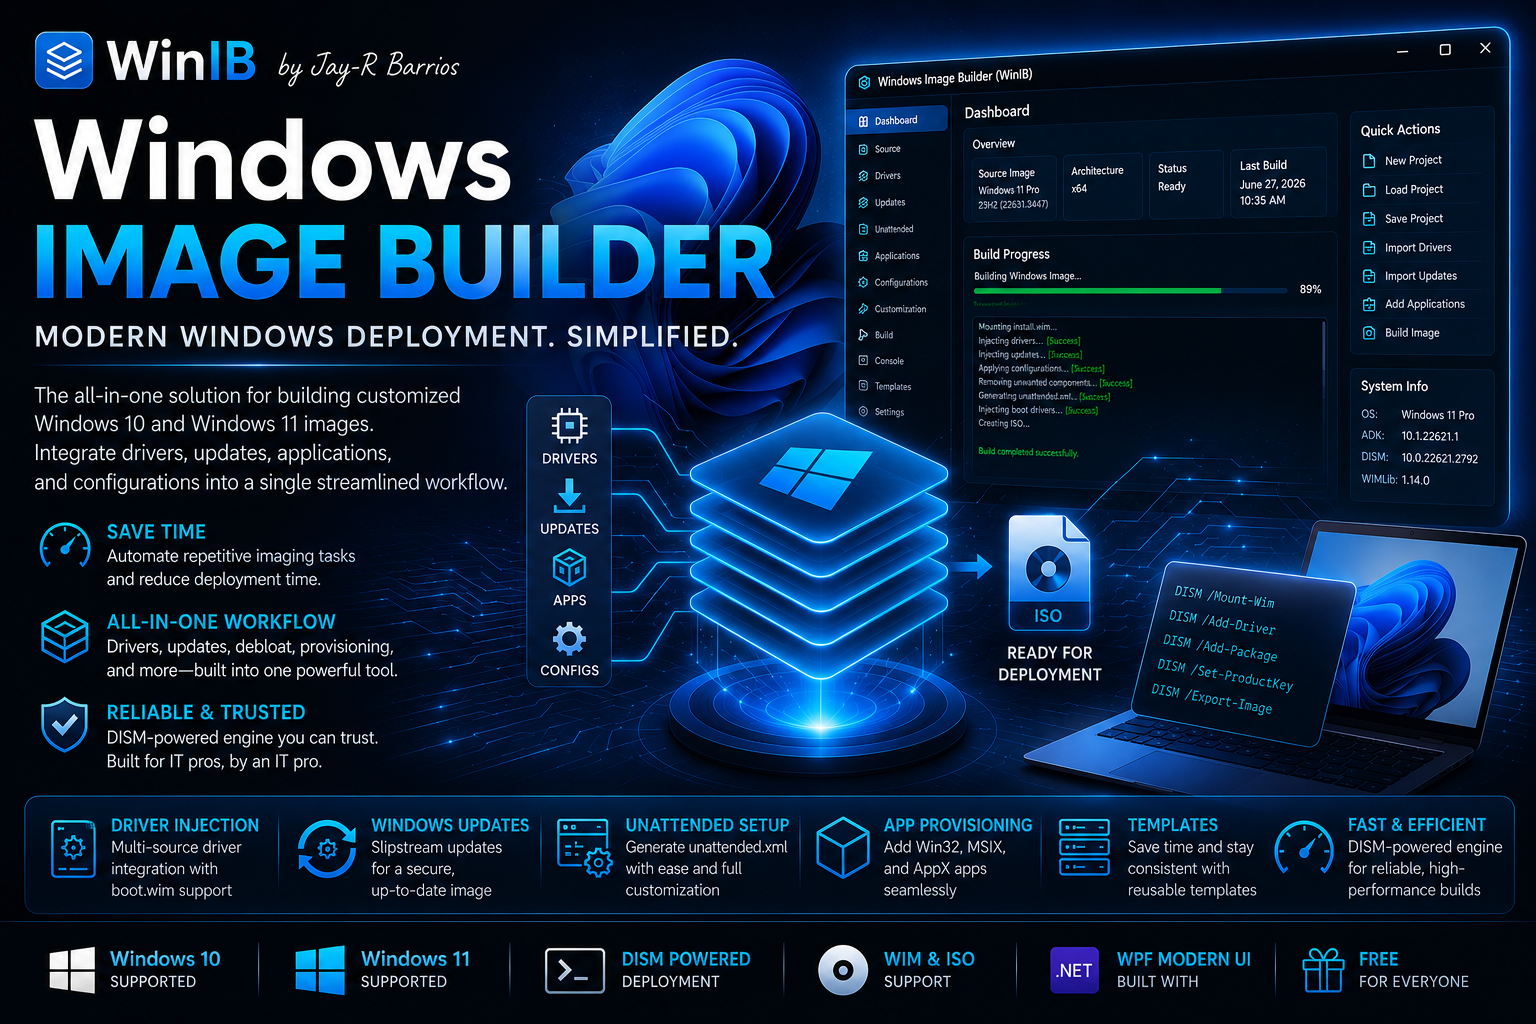
Windows Image Builder v1.0 – A Free, DISM-Based Deployment Image Tool for Windows 10/11
If you build Windows deployment images, you already know the dance, download the OEM driver pack, wrestle DISM, mount the WIM, inject, slipstream the latest cumulative, rebuild a bootable ISO, test, repeat. I do this constantly across lab boxes and demo units, so I wrapped the whole workflow into one small Windows app.
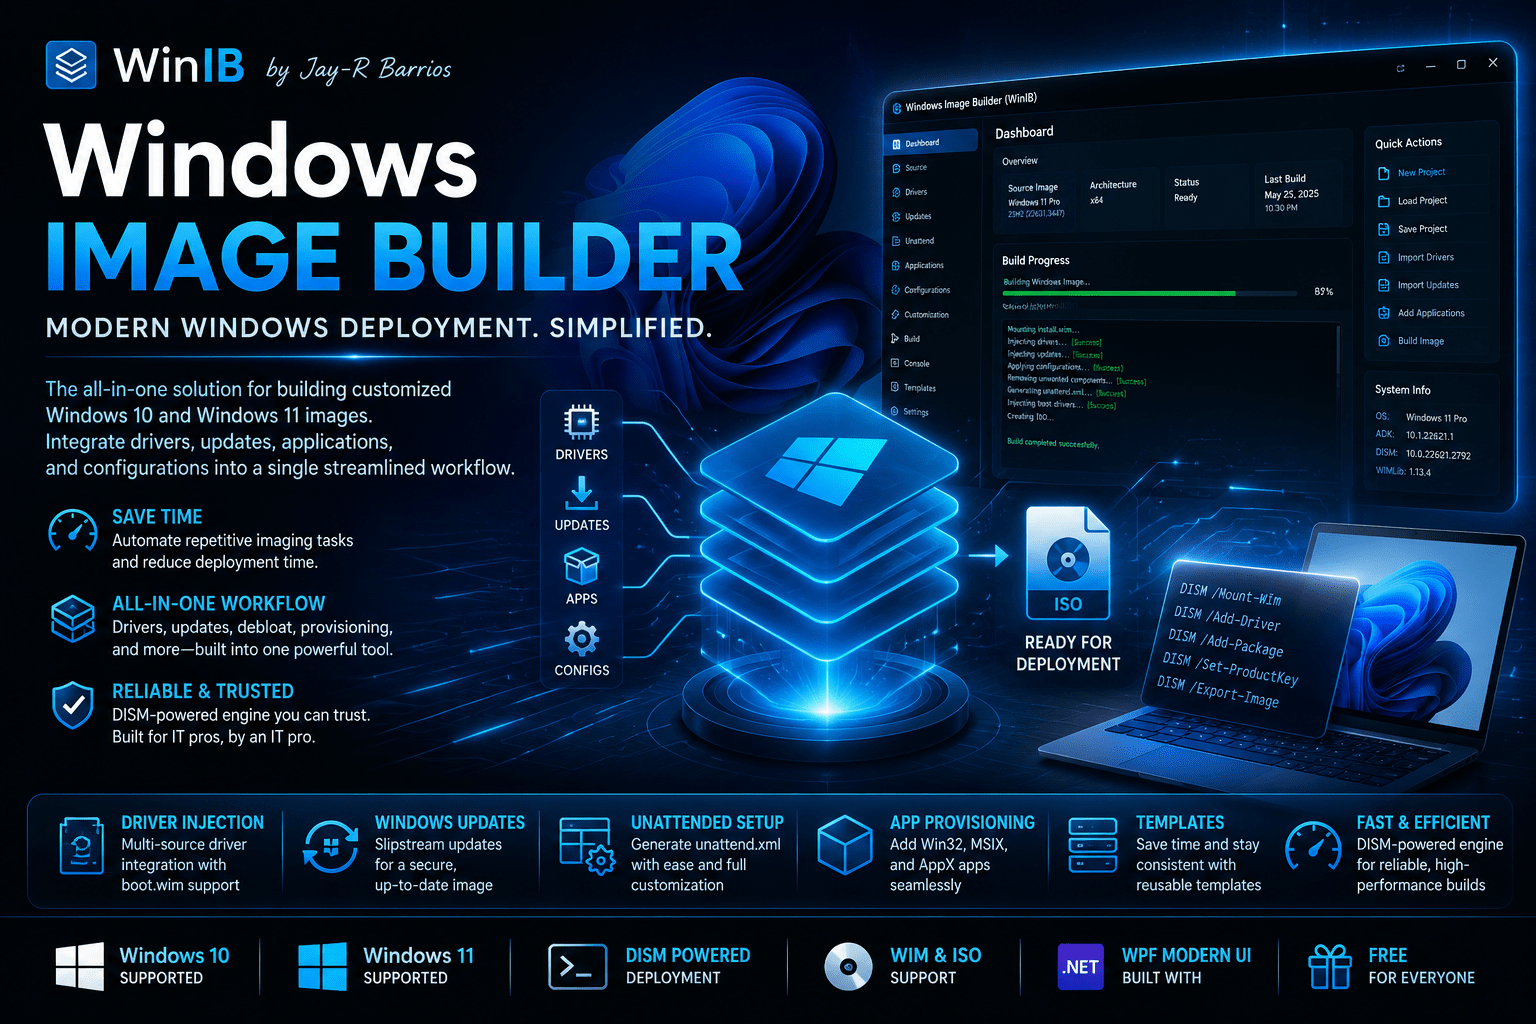
Windows Image Builder takes OEM driver packs and injects them — using DISM — into either an offline Windows image (WIM/ESD) or a Windows installation ISO, then rebuilds a fresh bootable ISO in a single pass. Along the way it can slipstream the latest cumulative update, debloat consumer apps, block the consumer-app auto-installer, provision the image for demo and lab use, lay down a custom partition layout, apply a product key, and run your own first-boot files and scripts — all in the same build.
It’s free to download and evaluate, and I’m genuinely open to feedback. Real-world reports from other practitioners are exactly what it needs to keep maturing — and a few of them already shaped this update (more on that below).

Key Updates
- UI overhaul — Windows Forms → WPF. The whole interface was rebuilt from the original Windows Forms beta onto a modern .NET 10 / WPF wizard: a clean left-to-right rail (Home → Image → Drivers → Settings → Build) and a live build console.
- Boot image drivers for RAID / Intel VMD machines. Optionally inject the storage-controller drivers into
boot.wimso Windows Setup can see the disk on machines with RAID / Intel VMD enabled — no more manual Load Driver at the partition screen. - Partition layout presets + a recovery partition. Optional OEM Ready Image and Standard UEFI layouts that wipe Disk 0 and lay down ESP + MSR + OS + a proper WINRETOOLS recovery partition, fully unattended.
- Windows product key (optional). Apply a key during the specialize pass — or leave it blank for KMS / Active Directory activation.
- Block consumer app auto-install. Stop Windows from silently re-downloading WhatsApp, Spotify, Instagram and friends on first internet connection — the thing that makes debloated images “un-debloat” themselves once they go online.
- Files / Scripts. Ship your own files and run up to ten first-boot PowerShell scripts in order.
- WinPE add-on prerequisite check. A live indicator and a pre-build guard for the one extra ADK component the boot-image feature needs.
What it does
Window Image Builder builds deployment-ready Windows images with the right drivers baked in. It takes driver packs — from the online Dell, HP and Lenovo catalogs, or any local extracted folder — and injects them via DISM into an offline Windows image (WIM/ESD) or a Windows installation ISO, then rebuilds a fresh bootable ISO.
Beyond drivers, it can:
- Slipstream Windows Updates so the image is current the moment it’s deployed.
- Debloat the consumer/sponsored apps you don’t want, and block the Content Delivery Manager from re-adding them online.
- Provision for demo and lab scenarios: local admin, OOBE bypass, regional settings, default wallpaper, BGInfo, Wi-Fi, and Microsoft 365 Apps.
- Service the boot image so RAID / Intel VMD machines install cleanly.
- Lay down a partition layout with a recovery partition, fully unattended.
- Apply a product key and add MSIX/AppX packages.
- Run your own first-boot files and scripts.
Driver pack sources
The DISM core is vendor-blind — it injects any folder of .INF drivers. For the three major business OEMs the app does the download and the extract for you; for anything else, grab the pack, extract it, and point the app at the folder.

| Vendor | Driver pack | How it works |
|---|---|---|
| Dell | Full Driver Pack Catalog (.zip / .cab) | Auto-downloaded and extracted by the app. Now the complete Command | Deploy catalog — Latitude, OptiPlex, Precision and Tablets, including older models — merged with the newer Dell Pro / Pro Max Family packs, each row tagged with its source. ✅ Validated end-to-end (incl. Latitude 5420 / Precision 7560 on real hardware). |
| HP | SoftPaq .exe (INF-based) | Auto-downloaded from the HP driver-pack catalog and silently extracted (/s /e /f). Catalog validated; extraction pending community testing. |
| Lenovo | SCCM/MDT pack .exe (by machine type) | Auto-downloaded from Lenovo’s catalog and silently extracted (/VERYSILENT /EXTRACT=YES). Rows tagged [full SCCM] vs [NVIDIA only]. Catalog validated; extraction pending community testing. |
| Microsoft Surface | Per-model .msi (drivers + firmware) | Use Local drive: extract with msiexec /a file.msi /qn TARGETDIR=C:\extracted → add the folder. |
| Acer / Asus / others | Individual per-model drivers | Use Local drive: gather the extracted .INF drivers into one folder → add it. |
A note of honesty on HP and Lenovo. Both catalogs load and parse live in the app, but I only have Dell hardware on hand, so the step I haven’t validated on real metal is the self-extracting
.exefor HP and Lenovo packs. If you run an HP or Lenovo build, watch the Log forrunning: …→Extracted (N INF files)and let me know how it went. If a pack’s switches differ, extract it by hand and use Local drive.
Tip: keep only the OS-matching subfolder (e.g. the Windows 11 / x64 set) to keep the image lean and the build fast.
Boot image drivers — RAID / Intel VMD machines
This one came straight out of field testing. A teammate booted a build on a Latitude 5420 with RAID (Intel VMD) enabled by default and Windows Setup couldn’t see the disk — the classic “we couldn’t find any drives” wall — until he manually loaded the Intel RST driver.
The reason: WinIB injects drivers into the OS image (install.wim), but Windows Setup itself runs from a separate boot image (boot.wim), which only carries Microsoft’s inbox storage drivers. On a RAID/VMD machine, that boot image can’t see the NVMe disk.
So there’s now a checkbox on the Drivers page — “Also inject storage drivers into the boot image”. When ticked, the build injects the selected storage-controller drivers (Intel RST / VMD) into boot.wim for both WinPE (index 1) and Setup (index 2), so Setup sees the disk with no manual Load Driver. It auto-filters to the storage-class INFs to keep boot.wim lean.
- ISO builds only, and it makes the build a little slower and
boot.wimlarger. - Leave it off for AHCI/NVMe machines or VMs (a VM never exposes Intel VMD, so the boot image already has what it needs).
- It needs the Windows PE add-on for the ADK (see Requirements) — the Prerequisites tab flags it, and the build warns up-front if it’s missing rather than failing cryptically mid-build.
Partition layout & a recovery partition
Also new on the Provisioning tab: an optional Partition layout for ISO clean installs. These are vendor-neutral UEFI/GPT layouts written into the answer file — they partition any UEFI machine (Dell, HP, Lenovo, VM) the same way; only the sizes differ.

| Layout | ESP | MSR | OS | Recovery |
|---|---|---|---|---|
| Windows default | — Setup manages partitions (you pick the disk during install) — | |||
| OEM Ready Image | 1500 MB | 128 MB | fills disk | 1000 MB WINRETOOLS |
| Standard UEFI | 500 MB | 16 MB | fills disk | 1000 MB WINRETOOLS |
How it works: the presets write a windowsPE-pass DiskConfiguration into autounattend.xml, so Setup partitions Disk 0 and applies the image with no “Where do you want to install Windows?” screen. The WINRETOOLS recovery partition is tagged with the Windows Recovery type GUID, so winre.wim lands there and reagentc /info reports recovery enabled. The recovery partition is placed first so the OS partition can Extend to fill the disk in a static answer file — the Microsoft-documented pattern, functionally equivalent to a vendor’s end-placed recovery.
The “OEM Ready Image” name just refers to the sizing convention — a large 1500 MB ESP gives headroom for firmware-capsule updates, multiple boot loaders and BitLocker. “Standard UEFI” is the leaner, general-purpose choice.
These presets WIPE Disk 0 and run Setup fully unattended. Always validate a partition preset in a VM before pointing it at a real machine. The default (Setup-managed) layout is unchanged and writes no disk config at all.
Windows Update slipstream
A fresh image is only fresh on release day. In Settings → Windows Update, tick to enable and choose how updates are sourced:
- Auto — the app finds the latest cumulative update for the image’s Windows version on the Microsoft Update Catalog, downloads it on the build PC, and slipstreams it with DISM during the build. (The download can be several hundred MB and needs internet on the build PC.)
- Your own folder — point at a folder of
.msu/.cabpackages (e.g. exported from WSUS) for offline or change-controlled environments.
Either way, DISM can’t query Windows Update live for an offline image, so the deployed PC still receives newer updates from Windows Update as normal — this just gets you a much more current starting point.
Debloat — and stopping the apps from coming back

Tick the provisioned apps you want removed — Xbox components, consumer / sponsored apps, Teams consumer chat, Skype, and so on. Core apps (Store, Calculator, Notepad, Photos, Paint, Snipping Tool) are always protected. Leave everything unticked to keep the image as-is.
Block consumer app auto-install.

Ever debloat an image, deploy it, connect to the internet, and watch WhatsApp, Spotify, Instagram and TikTok quietly appear anyway? That’s the Content Delivery Manager — a different mechanism from provisioned appx. Removing the appx strips what’s baked into the image, but the CDM re-downloads its own cloud list onto each new user profile the moment it goes online.
The new checkbox stops it. It seeds the reliable per-user keys into the image’s default-user profile (ContentDeliveryManager\SilentInstalledAppsEnabled=0 and related), so every new user inherits them, and adds the machine policy CloudContent\DisableWindowsConsumerFeatures=1 (honored on Enterprise/Education, harmless on Pro). It works whether or not you remove any apps above — so a debloated image actually stays debloated after it hits the network.
Provisioning for demo / lab

Settings apply to both ISO and offline-image builds.
- Local admin + OOBE: creates a local admin account (default
DemoAdmin, editable), optionally passwordless with auto sign-in, and bypasses OOBE straight to the desktop. - Regional / keyboard: sets locale and keyboard (UI language stays
en-USunless you add a language pack). - Default wallpaper: a JPG that becomes the system default theme wallpaper — shows even before activation, yet stays fully changeable, with no “managed by your organization” banner.
- BGInfo: copies your BGInfo folder to
C:\BGInfoand runs it at every logon. - Wi-Fi: imports a netsh-exported profile (
.xml, key=clear) for all users at first boot, plus an optional.ps1that runs once after drivers install. - Microsoft 365 Apps: tick to enable, then choose edition, update channel and architecture. At first boot the target downloads the Office Deployment Tool and installs M365 silently from Microsoft’s CDN. Requires internet on the target; it logs to
%TEMP%\WIB-M365.log. - Windows product key (optional): type or paste a 25-character key (it’s auto-capitalised) and it’s applied to the installed OS during the specialize pass. Leave it blank for KMS / Active Directory activation — those need no key here. Only enter a key you’re licensed to use; note that it’s stored in plaintext in the answer file and in saved templates.
A passwordless administrator account is for demo / lab use only — it is not a production posture.
Files / Scripts — your own first-boot payloads
Ship your own files and run scripts at first boot, no external tooling. Two lists, each capped at 10:
- First-boot scripts (
.ps1) — run top-to-bottom in the order you list them. They’re staged toC:\WIB\Scripts(numbered01-,02-…) and launched fromSetupComplete.cmd. Each call blocks until the script exits, so they run as a daisy chain — use the order numbers to sequence dependencies. - First-boot files & folders — documents, installers, any payload. Copied to
C:\WIB\Filesand exposed to your scripts via the%WIB_FILES%environment variable, e.g.Start-Process "$env:WIB_FILES\app\setup.exe".
Scripts run as SYSTEM after drivers install, with networking already up. Keep installers silent and avoid per-user/UI actions. The whole list is saved into build templates.
MSIX / AppX
Add .msix / .appx packages to provision into the image (DISM /Add-ProvisionedAppxPackage).
Save & Load build templates
Spent time ticking editions, driver packs, debloat and consumer-block choices, provisioning, partition layout, product key and update settings? Save it. On the Build page, Save template writes the whole configuration to a .wibtemplate file; Load template brings it all back for the next build, so a repeatable image is one click away.
Build, Log & output
On the Build page you review a summary, set the output ISO path (or update the offline image in place), and confirm the working folder. Click Start Build and the app moves to the Log page — the build console — with a live log, a progress bar, status, and a Cancel button (Cancel safely unmounts). The app locks down while a build runs so the configuration can’t change mid-build. When it finishes you get Build Completed, a Start a new build button, and — if anything warned or errored — View error to jump to the first one. Every build’s log is also saved to the working folder’s logs subfolder.
How to use it — build a driver-injected bootable ISO

- Image: choose your base Windows image (WIM/ESD/ISO source) and tick the edition(s) to service.
- Drivers: choose Online (OEM catalog), pick the vendor (Dell / HP / Lenovo) and OS, click Reload, then tick the pack(s) — or click Detect to auto-tick this machine’s model, or search to filter. For RAID / Intel VMD targets, also tick “Also inject storage drivers into the boot image.” (For Surface and others, use Local drive.)
- Settings: enable Debloat (and Block consumer app auto-install), Provisioning, Windows Update, product key, partition layout, MSIX, and Files/Scripts as needed; check Prerequisites.
- Build: review the summary, optionally Save template, set/confirm the output ISO and working folder, then Start Build.
- The app jumps to the Log page and runs: mount → inject drivers (and boot image, if ticked) → updates / debloat / provisioning / MSIX / files & scripts → rebuild a bootable ISO with
oscdimg→ clean up. - Write the finished ISO to USB with Rufus (NTFS, GPT, UEFI non-CSM), then boot the target to deploy with your drivers already baked in.
Prefer to service an offline image instead? Choose the offline-image target, select the install.wim / install.esd, tick the edition(s), and build — everything is written straight into the image, no ISO produced.
Requirements
Run Window Image Builder on a 64-bit Windows 10/11 machine with local administrator rights (it self-elevates via UAC on launch).
| Component | Needed for | Notes |
|---|---|---|
| .NET 10 Desktop Runtime | Running the app | Free from Microsoft if not already present. |
| DISM | All injection | Built into Windows — no install required. |
| Windows ADK — Deployment Tools | Building bootable ISOs | Provides oscdimg.exe. Install the minimum feature from Settings → Prerequisites. Offline-WIM injection works without it. |
| Windows ADK — Windows PE add-on (optional) | Boot-image servicing (RAID / Intel VMD) | A separate download from the Deployment Tools, installed at the same ADK version. Only needed if you tick inject storage drivers into the boot image. The Prerequisites tab shows it in amber when missing. |
| ~300 GB free on the working drive | Mounting, staging, ISO build | The Prerequisites tab flags anything under 300 GB. |
| Internet | Online catalogs, Windows Update, M365 | For OEM catalog downloads, catalog cumulative updates, and the ADK download. |
| Rufus | Writing the ISO to USB | Use NTFS + GPT + UEFI (non-CSM). |
Match the servicing host to the image. DISM can only service a Windows image that is the same version as, or older than, the host. Build on a machine whose Windows is at least as new as the image you’re injecting (e.g. service 24H2 from a 24H2+ host). Servicing a newer image from an older host fails with “requires the latest version of the DISM” — the fix is a newer host, or install the matching Windows ADK and run from its Deployment Tools.
Download & run it
Download: Windows Image Builder v1.0 — free to download and evaluate.
There’s no installer. Just extract the zip and run the executable. A couple of things to expect, because the app is not code-signed:

- SmartScreen may show “Windows protected your PC.” Click More info → Run anyway.
- It needs administrator rights and self-elevates, so you’ll get a UAC prompt on launch. If it doesn’t elevate on its own, right-click the exe and choose Run as administrator.
That’s expected for an unsigned community tool — but as always, only run software you’re comfortable with, and ideally test it on a throwaway lab VM first. A full user guide ships in the app’s Help page (and as a Word/HTML doc in the download).
Feedback welcome
This is a one-person, best-effort project, so I’d love to hear how it behaves on your hardware and image workflows — what worked, what broke, what’s missing. Drop a comment or DM.
If you have HP or Lenovo hardware: the catalogs are live, but I can’t validate the pack extraction myself. A single HP build and a single Lenovo build, with the Log output, would be hugely helpful — and I’ll fix anything that turns up fast. The Dell boot-image and partition features are validated on Dell metal; reports from other RAID/VMD machines are always welcome.
Disclaimer
This application is developed by an individual and is not an official tool of, nor affiliated with or endorsed by, any hardware or software vendor (Dell, HP, Lenovo, Microsoft, etc.). Its purpose is to assist with integrating driver packs and updates into Windows 10 and Windows 11 builds for demonstration and lab use. It may be applied to production images provided they go through your organisation’s proper testing and certification process. The software is provided “as is”, without warranty of any kind, express or implied; use it at your own risk. It is free to use and best suited to lab environments and demo machines. It is maintained by the developer, Jay-R Barrios (www.jayrbarrios.com), on a best-effort basis, with no guarantee of updates, fixes, or support.
Leave a Reply